
Macro Photography
Macro photography is a fascinating genre that allows photographers to capture the minute details of small subjects. By magnifying tiny objects, macro photography reveals a world that is often overlooked, showcasing intricate textures, patterns, and colors. In this article, we’ll explore what macro photography is, when to use the macro technique, the essential gear needed, and a step-by-step approach to capturing stunning macro images.
What is Macro Photography?
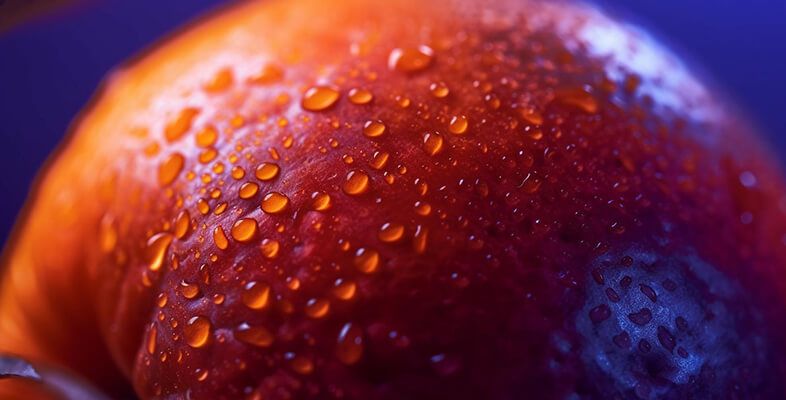
Macro photography is the art of taking close-up photographs of small subjects at high magnifications. This technique allows you to capture details that are not visible to the naked eye, making it ideal for photographing insects, flowers, water droplets, and other tiny objects. True macro photography is defined by a 1:1 ratio, meaning the subject appears life-sized on the camera’s sensor. However, many photographers extend this to higher magnifications to achieve even greater detail.
When is the Macro Technique Useful?
Macro photography is useful in various scenarios, especially when you want to highlight the fine details of small subjects:
Nature and Wildlife: Capture the intricate patterns on insects, the delicate petals of flowers, and the textures of plants. Macro photography in nature allows for a detailed study of flora and fauna.
Product Photography: Highlight the craftsmanship and details of small products, such as jewelry, watches, and electronics. Macro shots can showcase the quality and features of these items.
Abstract Art: Create abstract compositions by focusing on textures, patterns, and colors of everyday objects. Macro photography transforms ordinary items into visually compelling art.
Scientific Research: Document small biological specimens, minerals, and other subjects for scientific study and education. Macro photography provides detailed visual records for analysis.
Food Photography: Emphasize the textures and details of food items, such as the crust of a freshly baked bread or the seeds of a fruit. Macro shots add depth and interest to culinary images.
Essential Gear for Macro Photography
To capture high-quality macro images, specific gear is essential:
Macro Lens: A dedicated macro lens with a 1:1 magnification ratio is ideal. These lenses are designed for close focusing distances and provide sharp, detailed images. Popular focal lengths for macro lenses are 60mm, 100mm, and 150mm.
Extension Tubes: These are hollow tubes that fit between your camera body and lens, reducing the minimum focusing distance and increasing magnification. Extension tubes are an affordable way to achieve macro capabilities with your existing lenses.
Tripod: A sturdy tripod helps stabilize the camera, ensuring sharp images, especially when shooting at high magnifications and slower shutter speeds.
Focus Rail: A focus rail allows precise control over the camera’s position, making it easier to achieve critical focus in macro photography.
Lighting: Adequate lighting is crucial for macro photography. Use ring lights, LED panels, or off-camera flashes to illuminate your subject evenly and reduce shadows.
Diffusers and Reflectors: Diffusers soften harsh light, while reflectors bounce light back onto the subject, providing balanced illumination.
Remote Shutter Release: Minimizes camera shake caused by pressing the shutter button, ensuring sharp images.
How to Capture Macro Photos: A Step-by-Step Approach
Follow these steps to capture stunning macro images:
Choose Your Subject: Select a small subject with interesting details. Flowers, insects, and small objects are popular choices for macro photography.
Set Up Your Gear: Mount your camera on a tripod and attach a macro lens or extension tubes. Position your subject and set up any additional lighting or reflectors.
Switch to Manual Mode: Use manual mode to have full control over your camera settings. Set a low ISO (100-400) to reduce noise and maintain image quality.
Select Aperture and Shutter Speed: Choose a narrow aperture (f/8 to f/16) to achieve a deep depth of field, ensuring more of your subject is in focus. Adjust the shutter speed to balance the exposure, using a slower speed if necessary due to the narrow aperture.
Focus Manually: Use manual focus to ensure precise focusing. Autofocus can struggle at high magnifications and may not focus on the exact point you want.
Use a Focus Rail: If available, use a focus rail to make fine adjustments to the camera’s position. This helps achieve critical focus on small subjects.
Check Your Composition: Frame your subject carefully, considering the background and any distracting elements. Adjust your composition to highlight the most interesting aspects of your subject.
Take Test Shots and Adjust Lighting: Take a few test shots to check exposure and lighting. Adjust your lighting setup as needed to achieve even illumination and reduce shadows.
Capture the Image: Use a remote shutter release or the camera’s timer to take the shot, minimizing camera shake. Take multiple shots with slight focus adjustments to ensure you capture the best possible image.
Post-Processing: Edit your photos using software like Adobe Lightroom or Photoshop. Adjust exposure, contrast, sharpness, and colors to enhance your images. Focus stacking can be used to combine multiple shots with different focus points, increasing the depth of field.
Conclusion
Macro photography opens up a world of intricate details and fascinating subjects, allowing you to explore and capture the beauty of the tiny world around us. With the right gear and techniques, you can create stunning images that reveal the often unseen details of nature, products, and everyday objects. By following this step-by-step approach and experimenting with different settings and compositions, you can master the art of macro photography and take your skills to the next level.


Or Get YourMoney Back
back your money in the rare case you are not satisfied with the quality of your
damage-free pictures. Only $38 for most image restorations regardless of damage


All rights reserved.

